

Making your own strawberry jam recipe at home isn’t just about stirring fruit and sugar in a pot—it’s about capturing summer in a jar. From fresh-picked strawberries to the satisfying “pop” of a sealed lid, there’s a certain magic to homemade jam that store-bought just can’t match.
In this article, you’ll discover how to whip up an easy Strawberry Jam recipe using just a few ingredients and simple tools. We’ll guide you through each step, from picking the right berries to preserving your jam for months of deliciousness. Along the way, you’ll also learn smart variations, clever troubleshooting tips, and ways to enjoy your jam beyond toast.
Let’s dive in and turn those juicy red berries into something truly unforgettable.
Why Homemade Strawberry Jam is Worth It
The Irresistible Charm of Homemade Jam
Let’s be real—there’s nothing quite like spooning your own sweet-tart jam onto warm toast or a fresh scone. Homemade jam has a depth of flavor that just blows the commercial stuff out of the water. It’s thick, syrupy, and tastes like pure strawberries. No weird preservatives, no mystery ingredients—just real fruit and love in every bite.
And hey, you’re in control. Want it chunkier? Smoother? Less sugar? No problem. Plus, there’s just something soul-satisfying about watching berries bubble away on your stovetop, knowing that in a little while, you’ll have a jar full of joy ready to go.
Benefits Over Store-Bought: Flavor, Freshness, and Control
One of the biggest perks of this strawberry jam recipe is that you know exactly what’s going into your food. No high-fructose corn syrup, artificial colorings, or shelf-stabilizers—just strawberries, sugar, and lemon juice.
You also get to choose how sweet it is, how chunky or smooth the texture feels, and even whether you want to add a twist like mint, basil, or a hint of citrus zest.
Not to mention, if you’re swimming in ripe berries during strawberry season, making jam is a smart way to preserve all that juicy goodness without waste. Whether you’re prepping small batch strawberry jam for the week or canning jam for the winter months, the homemade route wins every time.
Up next, let’s get familiar with the few simple—but essential—ingredients that make this jam shine.
Great! I’ve reviewed the internal pages on biterecipe.com, and the most relevant internal link opportunity for this topic would be the lemon cookies recipe page, since it aligns well with the citrusy notes in jam-making.
Essential Ingredients for the Best Strawberry Jam Recipe
Fresh Strawberries: Choosing the Right Ones for Jam-Making
When it comes to crafting the perfect strawberry jam recipe, it all begins with the fruit. Not all strawberries are created equal—bright red, fragrant, and fully ripe berries bring out that rich, deep jam flavor everyone craves. Surprisingly, the softer strawberries you might pass over for a fruit salad are exactly what you want here.
Got berries that are a little overripe? Great! As long as there’s no mold, they’re perfect for jam. The natural sugars are concentrated, which means bolder taste and smoother texture. Smaller, local strawberries also tend to pack more flavor than those huge, watery ones from the store.
Sugar and Lemon Juice: The Unsung Heroes of Homemade Jam
Sure, strawberries steal the show, but sugar and lemon juice play the critical backup roles. Sugar isn’t just a sweetener—it helps thicken the jam and acts as a preservative. That means your delicious jam won’t just taste amazing, but it’ll also last longer.
Then there’s lemon juice. Don’t skip it! It brightens the flavor and gives the jam that subtle tangy kick. Even more importantly, lemon juice balances the pH and helps the jam set properly without using store-bought pectin.
For an extra citrusy twist, you could check out this delightful lemon cookies recipe—a perfect companion to homemade jam!
Let’s move on to actually making the jam, shall we?
How to Make Strawberry Jam – Step-by-Step Guide
Prepping Your Strawberries: Washing, Hulling, and Chopping
Alright, it’s go time! First things first—prep your berries like a pro. Wash them thoroughly under cold water to remove dirt and residue. Then, hull them by slicing off the green tops or using a straw to pop the stems right out. This hack saves time and preserves more of the fruit.
Chop them up roughly. There’s no need for precision here since they’ll break down during cooking. If you like your jam smoother, give the strawberries a quick pulse in a food processor—but don’t turn them into soup!
Cooking Process: Boiling, Simmering, and Stirring Techniques
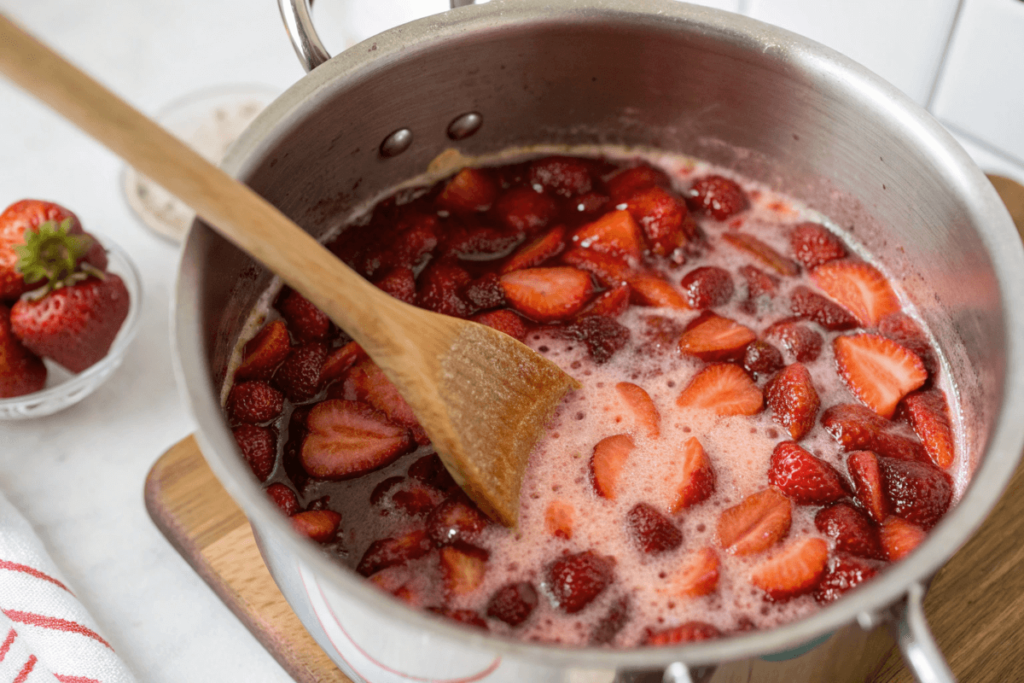
Toss the strawberries into a large pot with sugar and lemon juice. Set the heat to medium-high and stir, stir, stir! You want to bring the mix to a nice rolling boil while keeping a close eye on it to prevent sticking.
Once boiling, turn the heat down to medium-low and let it simmer gently. Stir often to keep everything moving—this is crucial for even cooking and avoiding that dreaded burnt-bottom taste.
Let the mixture bubble away for 40–50 minutes, or until it hits 220°F on a candy thermometer. No thermometer? No problem. Just use the classic freezer test: drop a bit of jam on a cold plate, wait a few seconds, and drag your finger through it. If it leaves a clean path, your jam is ready.
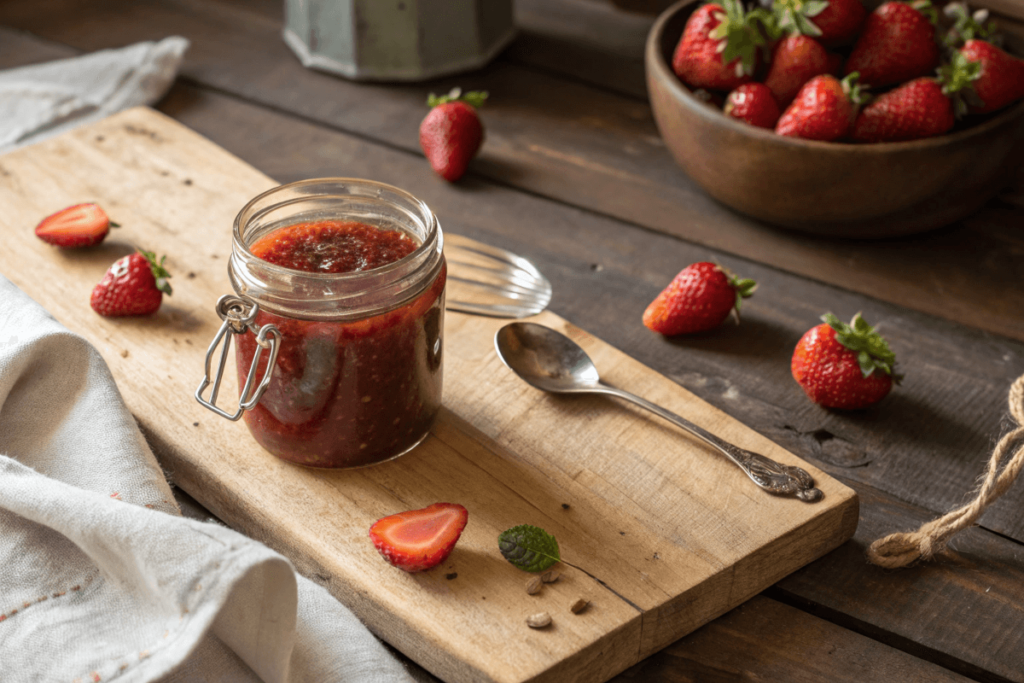
Now’s the moment to spoon it into sterilized jars. Seal them tight and let the jars cool before popping them in the fridge—or water-bath canning them for long-term storage.
With just a handful of ingredients and a bit of patience, you’ve nailed a stellar strawberry jam recipe that’s sweet, glossy, and bursting with berry flavor.
Easy Strawberry Jam Recipe Variations
Pectin vs No Pectin: Which is Better ?
Let’s clear the air—you don’t need pectin to make an amazing strawberry jam recipe. While commercial pectin speeds up the process, it can actually take away from that thick, slow-cooked texture we all love. Strawberries have some natural pectin, and with the help of lemon juice and sugar, they thicken up beautifully when cooked low and slow.
But hey, if you’re in a pinch or want to make a low-sugar version, powdered pectin can be helpful. Just follow the instructions on the box and adjust your sugar levels accordingly. It’s all about what works for your taste and time.
Flavor Twists: Herbs, Spices, and Floral Notes
Now for the fun part—let’s play with flavor. Once your jam is nearly set, toss in a few extras to take it from classic to creative. How about a whisper of fresh basil or mint? These herbs add a cool, earthy depth. Craving something cozy? A pinch of cinnamon or nutmeg brings warmth and richness.
You can even add a dash of rose water or lavender for a floral vibe. Just be careful—not too much! A few drops go a long way. These additions can turn your basic batch into something truly gourmet.
Experimenting with flavors is what makes a homemade strawberry jam recipe so special. You get to make it your own—no rules, just delicious results.
How to Store and Preserve Strawberry Jam
Short-Term Storage: Refrigerator and Freezer Jam Options
So you’ve whipped up a beautiful batch of jam—now what? If you’re planning to enjoy it within the next couple of weeks, the fridge is your best friend. Just pour the hot jam into clean jars, seal tightly, and let them cool at room temperature before chilling.
Want to keep your strawberry jam recipe around for months without diving into canning? Freezer jam is a game-changer. Use freezer-safe jars, leave about an inch of space for expansion, and store them in the freezer. Your jam will stay fresh for up to a year. When you’re ready to use it, thaw it overnight in the fridge. Easy peasy!
Canning Strawberry Jam: Water Bath Method for Shelf Stability
If you’re going all-in and want shelf-stable jam, then canning is the way to go. It sounds intimidating, but it’s actually super doable. First, sterilize your jars by boiling them or running them through the dishwasher’s sanitize cycle. Once your jam hits that 220°F sweet spot, ladle it into hot jars, leaving a little headspace.
Next, place the sealed jars in a boiling water bath for about 10–15 minutes. This process creates a vacuum seal that keeps your jam safe and shelf-stable for up to a year.
Once they cool, check the seal by pressing down on the lid. If it doesn’t pop back, you’re good to go! Now you’ve got a delicious homemade jam ready for breakfast spreads, sweet snacks, or surprise gifts.
For more delicious recipes and kitchen inspiration, check out another tasty post over at BiteRecipe.com.
Troubleshooting Common Strawberry Jam Issues
Why Your Jam Didn’t Set and How to Fix It
Let’s be honest—sometimes your strawberry jam recipe just doesn’t turn out the way you hoped. If it ends up too runny, don’t panic! There are several reasons it might not set. Maybe it wasn’t cooked long enough, or it didn’t hit that magic 220°F mark. Another culprit? Not enough acidity from the lemon juice to activate the fruit’s natural pectin.
The good news? You can still fix it! Pour the jam back into a pot, bring it to a boil, and simmer for another 5–10 minutes. You can even add a tablespoon of lemon juice or a small amount of commercial pectin to help it thicken. Then go ahead and re-jar it as usual.
Avoiding Overcooking and Burning During the Simmer
On the flip side, overcooking is just as risky. If your jam gets too dark or tastes a bit like caramel, chances are it cooked too long or got scorched at the bottom. This happens when you don’t stir often or use too high heat.
To avoid this mess, always stir your jam regularly—especially once it starts thickening. A heavy-bottomed pot also helps keep the heat even. And remember: simmer gently. It’s better to cook a little longer on lower heat than rush it and end up with burned bits.
Making mistakes is part of the jam journey, but now you know how to dodge the most common ones and keep your strawberry jam recipe on track.
Delicious Ways to Use Your Homemade Strawberry Jam
Breakfast to Dessert: Toast, Oatmeal, Ice Cream, and PB&J
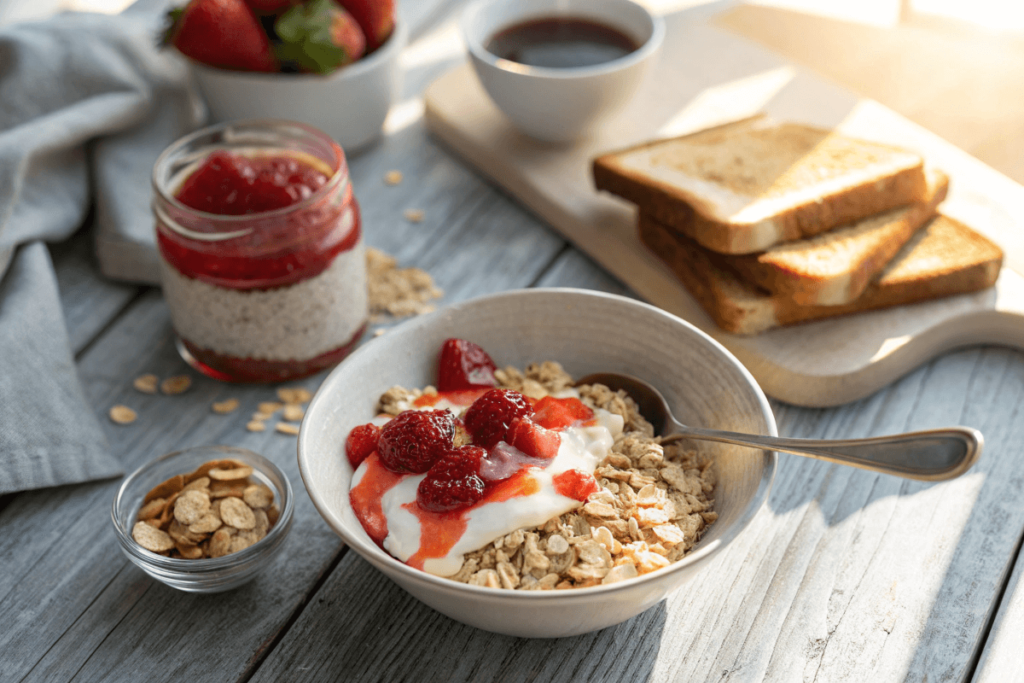
Sure, slathering jam on toast is classic—but don’t stop there! Your strawberry jam recipe can be the hero of so many meals. Swirl it into warm oatmeal or spread it on pancakes for a sweet, fruity upgrade. Add a spoonful to yogurt, cottage cheese, or even your smoothie bowl for that natural berry kick.
Feeling indulgent? Drizzle warm jam over vanilla ice cream or fold it into whipped cream for a quick berry mousse. And of course, let’s not forget the timeless peanut butter and jam sandwich. Whether you go chunky or smooth on the peanut butter, this combo never disappoints.
Creative Ideas: Vinaigrettes, Baked Goods, and Glazes
Want to go savory? Mix a spoonful of jam with balsamic vinegar and olive oil for a tangy vinaigrette. Or, whisk it into your next barbecue glaze or meat marinade to add that sweet-tart depth.
Love baking? Use jam as a filling for thumbprint cookies, pastries, or layer cakes. You can even swirl it into banana bread batter or muffins before baking for a surprise burst of flavor.
The options are endless. Your strawberry jam recipe isn’t just for toast—it’s a versatile, flavor-packed addition to your kitchen arsenal.
Pro Tips for a Perfect Strawberry Jam Every Time
Choose Overripe (Not Moldy) Strawberries for Deep Flavor
Here’s the thing—your strawberry jam recipe is only as good as your strawberries. So don’t reach for the prettiest ones; instead, go for the deeply red, soft, and fragrant berries. Those slightly overripe ones are loaded with natural sugars and bold flavor. As long as there’s no mold, they’re golden for jam-making.
If you’ve got a bunch of strawberries that are a bit too soft to eat fresh, don’t toss them—jam them! You’ll be amazed at how much richness they bring to the mix.
Stir Often and Sterilize Jars Properly
While the fruit is cooking, stirring regularly is non-negotiable. It keeps things moving, prevents burning, and helps the mixture reduce evenly. A long-handled spoon is ideal for staying safe while keeping the jam from sticking.
Now let’s talk jars. To help your strawberry jam recipe last longer—especially if you’re storing it outside the fridge—sterilizing is key. Either boil the jars for 10–15 minutes or run them through your dishwasher’s sanitize cycle.
Once you start using these simple pro tips, you’ll notice the difference. Not only will your jam taste better, but it’ll also store beautifully—and that means more chances to enjoy it later!
FAQs – People Also Ask (300 words)
How to Make Strawberry Jam Recipe Without Pectin?
Great question! One of the best things about a traditional strawberry jam recipe is that it doesn’t need pectin. Strawberries contain some natural pectin, and when cooked down with sugar and lemon juice, they thicken naturally. The key is to simmer long enough and let the mixture reach 220°F (the setting point). No pectin, no problem!
What Is a Recipe for Strawberry Jam That’s Easy for Beginners?
If you’re just starting out, keep it simple. Stick to three ingredients: fresh strawberries, granulated sugar, and lemon juice. Prep your fruit, cook everything in one pot, and follow the temperature cues. Don’t forget to do the freezer plate test! If the jam wrinkles when you run your finger through it, you’re good to go. This strawberry jam recipe is beginner-friendly and foolproof.
How to Can Strawberry Jam Recipe for Long-Term Storage?
Canning may sound scary, but it’s actually quite straightforward. After your jam is cooked, pour it into sterilized jars, leaving about 1/4 inch of headspace. Wipe the rims, seal with lids, and process in a boiling water bath for 10–15 minutes. Let the jars cool fully, then check the seal by pressing the center of the lid. If it doesn’t bounce back, it’s sealed! Shelf-stable jam for up to a year—how cool is that?
Can I Make Strawberry Jam with Frozen Strawberries?
Yes, you absolutely can! Just make sure to thaw the berries fully and don’t drain the juices. That liquid has loads of flavor and helps the jam come together. The rest of the process is exactly the same. It’s a great option when fresh strawberries are out of season but you still want to whip up a quick strawberry jam recipe.
Final Thoughts and Reader Tips
Encourage Experimentation with Flavors and Techniques
Now that you’ve mastered the basics, it’s time to make this strawberry jam recipe truly your own. Don’t be afraid to play around—try adding herbs, spices, or even a splash of vanilla for something unique. Whether you’re going for a small batch or planning to can for the season, there’s always room to experiment.
You can also test different textures by mashing the berries more or less, or even blending part of the batch for a smoother spread. Every tweak teaches you something new, and the best part is—you still end up with jam!
Invite Readers to Share Their Favorite Ways to Enjoy It
Have your own jam tricks or flavor spins? We’d love to hear them! Share your favorite ways to enjoy this strawberry jam recipe in the comments. Whether you spread it on toast, swirl it into desserts, or use it in savory dishes—we’re all ears.
Let’s keep the jam love going!